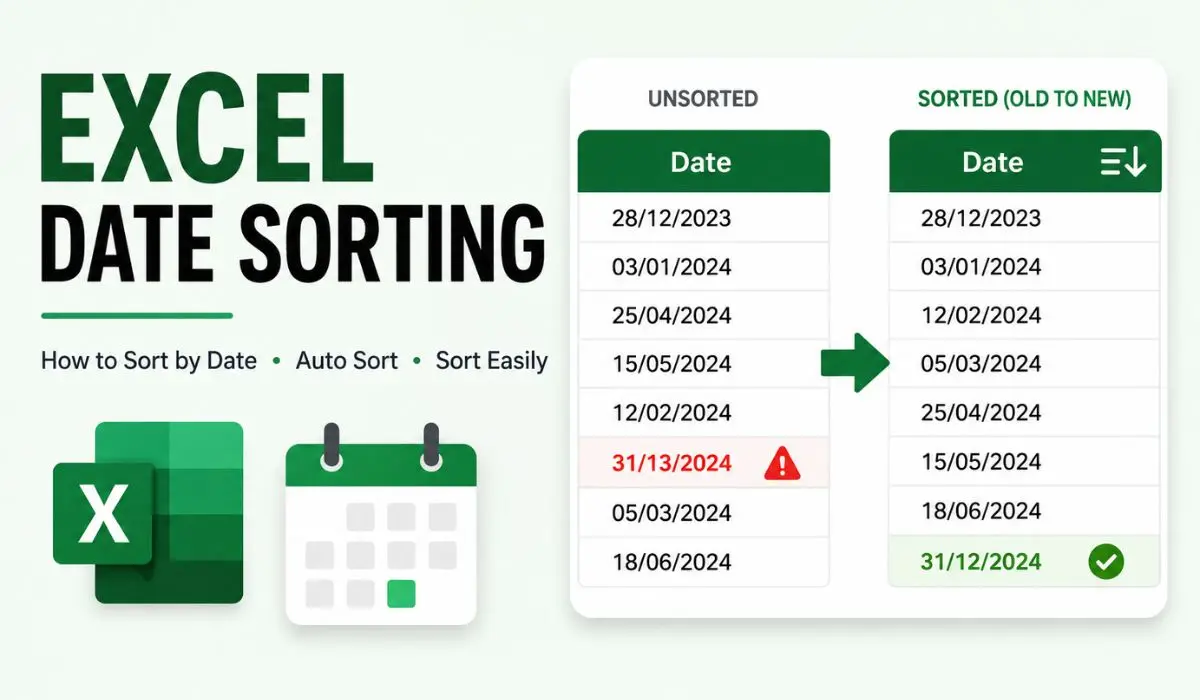


Excel date sorting is one of the most useful features of MS Excel. Whether you wish to organize your relatives’ birthdays so you can send them a greeting card, organize your weekly budget transactions for the fiscal year, or perhaps keep track of the sales figures every month. All these things can be done effectively using the Excel date sorting feature in MS Excel.
The beauty of this feature is that you have the liberty to organize your entries in accordance with the date. You can sort the dates by day, week, month, or year. Alternatively, you can even arrange the dates in ascending or descending order.
Sorting the dates in chronological order might be helpful when you have a huge data set to evaluate. Excel includes certain built-in tools to accomplish the task, but occasionally they fall short of our expectations.
Date-sorting errors can occur occasionally, and it can be very inconvenient. But luckily, common date-sorting errors in Excel are easily recognised and can be fixed just as easily.
In this blog, we will provide a comprehensive guide to performing Excel date sorting without any hassle across both modern and older versions. We will also look at the most common date sorting errors in Excel and find out how to fix them. It will help you sort dates in Excel using both basic and advanced methods. So, without further ado, let us get started with the guide.
Different Methods for Excel Date Sorting
Although Excel’s built-in sort capabilities are strong and better equipped, they occasionally fail to sort dates properly. This post will show you a few practical tips for organizing Excel data by date in a meaningful manner without affecting the quality of your data.
We will also showcase how these methods can be useful for customer success professionals working in B2B organizations, especially when organising customer data and improving customer success automation processes.
Dates Arranged Chronologically
Excel makes it remarkably simple to organize dates chronologically. You select the default Ascending Sort option:
- The dates you want to order chronologically should be chosen.
- Select Sort Oldest to Newest under Sort & Filter on the Home Tab’s Formats group. Alternatively, you can use the Sort & Filter group’s A-Z option under the Data tab.
Scenario Where Customer Success Professionals Can Use This Excel Date Sorting Method:
There are times when customer success professionals need to prioritize the accounts based on dates in chronological order. This can be because they want to send subscription reminder emails. It can even be to keep a check on the payment date of a particular account.
Sorting Dates in a Column
It is fairly easy to arrange a column of dates if that is all you are worried about. Let us say you need to sort only the dates in Column A of the dataset below. The steps to date-order this data are as follows:
- Choose the column containing the dates you wish to arrange by.
- Locate the – Sort and Filter – group under the Data tab. You have several options for sorting the chosen data in this category. Depending on your needs, you can choose either “Sort Oldest to Newest” or “Sort Newest to Oldest” for a straightforward sorting operation.
- You might be asked if you want to keep your current option or expand it to include the other columns. We selected the second option since we currently want to sort the selected column.
- Select Order from the menu.
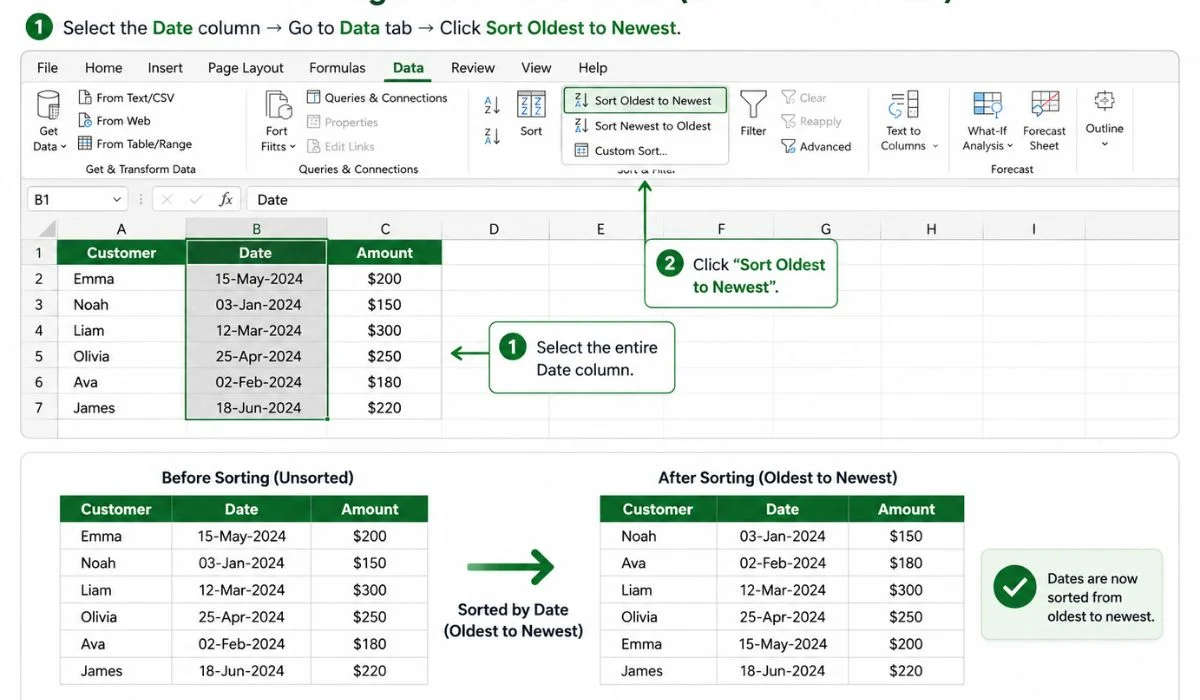
That is it; based on your choice, the selected column will be sorted from newest to oldest date or from oldest to newest date.
Scenario Where Customer Success Professionals Can Use This Excel Date Sorting Method:
For customer success, professionals must prioritize the accounts from the oldest to the newest. It is during such times when this Excel date sorting method is utilized.
Sorting Data in Multiple Columns Using Date
In more practical terms, you should not sort by a single column. Let us say you need to sort a dataset like the one below based on the date in Column A. The steps to sort multiple columns using the date column are as follows:
- Handpick all the cells that you wish to sort.
- Inside the Data menu ribbon, handpick the ‘Sort’ button (in the Sort & Filter group). This will open the Sort dialog.
- There are 3 dropdown lists in this specific dialog.
- Using the first dropdown menu, you can choose the column to organize the data. Make sure to select the column that contains your dates.
- You can choose what to order from the second drop-down menu. For this, make sure the “Value” option is chosen.
- You can choose the dates’ sorting order using the third dropdown menu (oldest to newest or newest to oldest). Even better, you can design your unique sort order. However, let us save that for a different tutorial. Decide the order you want your dates to be sorted.
- After that, click OK.
Depending on what you provided, this should sort your dates in either ascending or descending order. Additionally, move the cells.
Scenario Where Customer Success Professionals Can Use This Excel Date Sorting Method:
There are times when customer success professionals use different columns to define the date on which the account started and the date on which its subscription will end. When managing multiple customer records, this Excel date sorting method can support account management activities by keeping important timelines organised.
With Columns of Text, Format your Cells in Date Format
The steps for converting text to date in Excel using Text to Columns are as follows:
Step 1: Choose the column containing the dates you wish to order by.
Step 2: Click Text To Columns under the Data tab (in the Data Tools group). The Text to Columns dialogue will now open.
Step 3: You can choose whether the data in the chosen cells are delimited in this dialogue box’s option. If the phrase “delimited” is new to you, it refers to the character that designates how data in cells is divided, such as when sections of your date are separated by the symbol “/.” In this case, a ‘/’ character serves as the delimiter. Make sure that the ‘Delimited’ alternative is preferred.
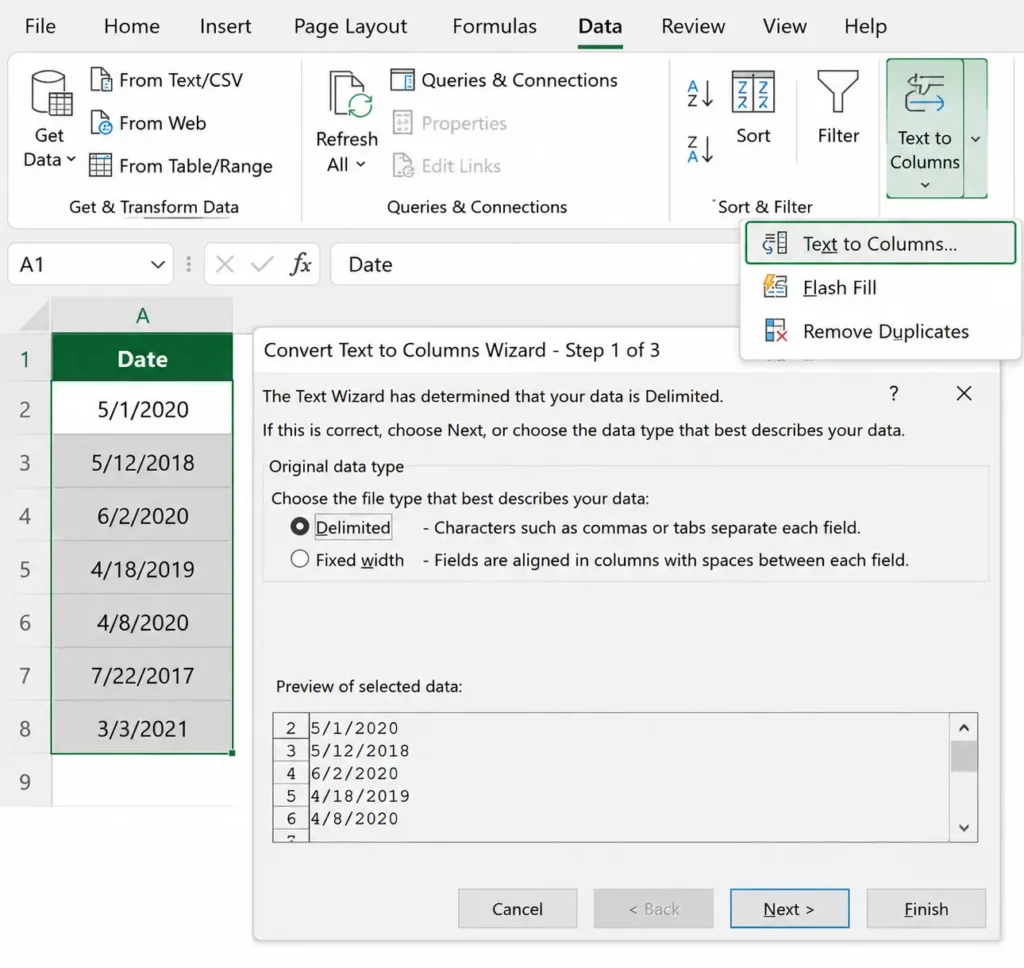
Step 5: Ensure all of the checkboxes in the dialog’s subsequent section are unchecked. This is because the separator in your situation is pretty much irrelevant.
Step 6: Choose Next.
Step 7: The important thing is this. You can choose the format of your date in this section of the dialogue. Choose “Date” using the radio button (under Column Data Format). You can choose the format in which your dates will be presented by using the dropdown list located next to this option. Like in our example, you can choose the DMY option if your dates are in the dd/mm/yy format. There are other additional options available; pick the one you like best.
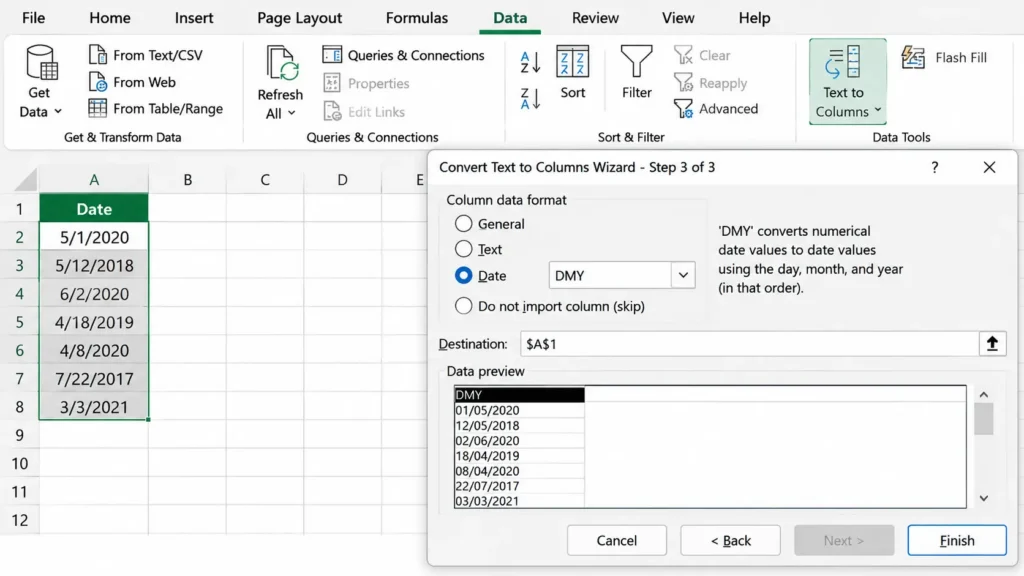
Step 8: Click Finish to finish.
Step 9: Use the =ISTEXT() function once more to confirm whether your cells have been successfully transformed to dates. If you receive a FALSE result this time, Excel now interprets your cells as dates rather than words.
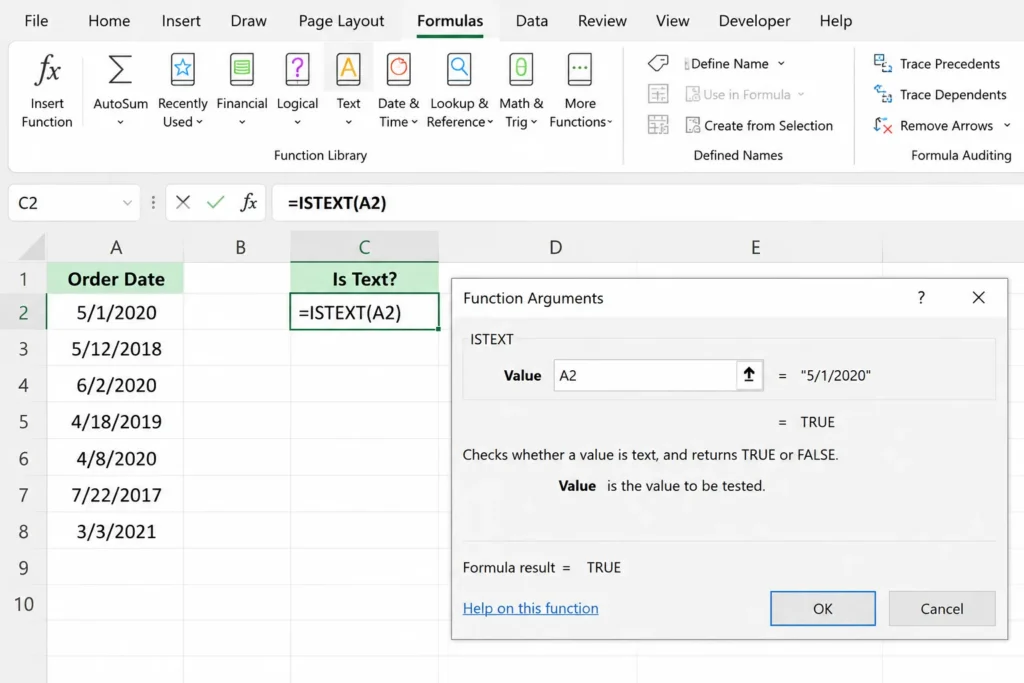
Scenario Where Customer Success Professionals Can Use This Excel Date Sorting Method:
There are times when customer success professionals wish to convert the data they have at their disposal into data; this is where this Excel date sorting method is used.
Excel Data Sorting by Date
To choose the dates you want to sort by, drag down the column. Click the Oldest to Newest or Newest to Oldest buttons under the Sort & Filter section of the Home tab.
You can rearrange the entire table using the Excel sort options, not just a single column. The trick is to expand the selection when prompted to sort records by date while maintaining the rows.
The specific steps to sort data in Excel by date are as follows:
1. Select the dates in your spreadsheet without selecting the column headers.
2. Select Sort Oldest to Newest under Sort & Filter on the Home tab.
3. You will see the Sort Warning dialogue box. Click Sort: and select the default Expand the selection option.
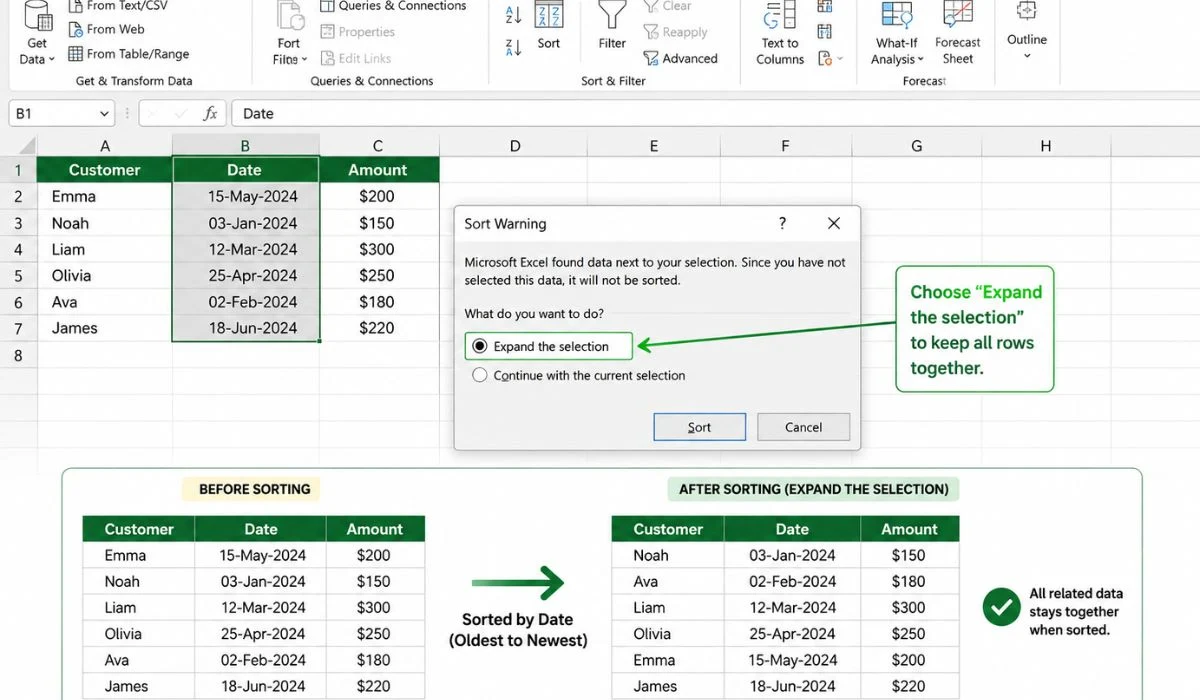
4. You have achieved the objective. All the rows are maintained together once the records have been sorted by date:
Scenario Where Customer Success Professionals Can Use This Excel Date Sorting Method:
Customer success professionals sometimes need to maintain accounts based on important dates such as account creation or lifecycle milestones. Organised customer records can also help teams monitor account progress and maintain an accurate customer health score.
Why Excel Won’t Sort Dates Correctly
If you have tried the usual steps to sort dates in Excel and still find yourself stuck, you might be facing one of these errors. Excel will refuse to sort your dates if any of the following is the issue.
- Dates stored as text: If your date data was stored in Excel as text, it will get sorted alphabetically instead. You can fix this using the Text to Columns tool.
- Mixed Date formats: If your date data does not follow a consistent format, sorting can be difficult. For example, you may write 05/01/2001 as one date and the next one as 6 January, 2001.
- Hidden spaces: Your data may contain hidden spaces or characters that cause sorting errors.
- Imported CSV dates: Sometimes, imported CSV dates are read as text instead of dates, resulting in alphabetical sorting.
- Regional date formats: Date formats are not universal. If your system follows a different format than the data set, it can lead to sorting errors. E.g: DD/MM/YYYY against MM/DD/YYYY.
How to Sort Dates in Excel Without Mixing Rows
One of, if not the most frustrating, experiences of working with dates in an Excel spreadsheet occurs when the dates are sorted chronologically, but the rest of the data stays in the same place. Here are two ways you can avoid it.
Expand the Selection
Select a single cell in the date column first. Go to Data and click Sort. A pop-up box will appear. Check whether Expand the selection is checked and select the chronological order you prefer.
Selecting the Entire Table
Click a single cell in the table. Press Ctrl + A. Go to Data>Sort and check My Data has a header. Select your date column under Sort By and apply the chronological order you prefer. This only works if your data has headers.
Adopting one of these two methods can help you keep your related rows together while they are sorted by date. Keep in mind that sorting only one column will give you a perfectly ordered date column, but the rest of your table will stay the same.
Monthly Data Sort
For example, when collecting the anniversaries of your coworkers or relatives, you might choose to organize dates by month rather than the year. In this situation, even if your cells display only the month or the month and day, Excel’s default sort feature will not function since it always considers the year.
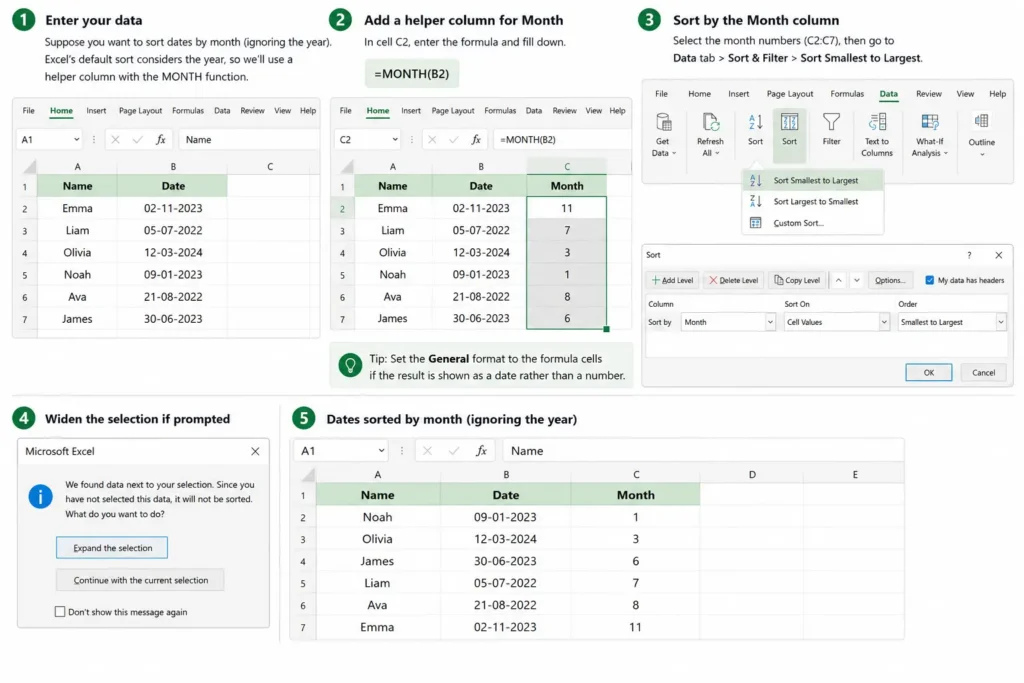
The solutions are adding a helper column, removing the month number, and sorting by that column. Use the MONTH function to determine a month from a date.
The formula shown below is used to get the month number from the date in B2:Monthly data sort
For example, when collecting the anniversaries of your coworkers or relatives, you might choose to organize dates by month rather than the year. In this situation, even if your cells display only the month or the month and day, Excel’s default sort feature will not function since it always considers the year.
The solutions are adding a helper column, removing the month number, and sorting by that column. Use the MONTH function to determine a month from a date.
The formula shown below is used to get the month number from the date in B2:
=MONTH(B2)
Tip: Set the General format to the formula cells if the result is shown as a date rather than a number.
Sort your table now using the Month column. For this, choose the month numbers (C2–C8), then click Sort & Filter > Sort Smallest to Largest. When Excel prompts you to widen the selection, do so. If everything is done correctly, you will obtain the following outcome:
Scenario Where Customer Success Professionals Can Use This Excel Date Sorting Method:
When the customer success professional wishes to sort the birthdays of the accounts based on the month of the year, they use this Excel date sorting method.
Birthdays Sorted by Month and Day
The best way to arrange dates for a birthday calendar is to group them by month and day. As a result, you require a formula that would extrapolate months and days from birthdates.
The Excel TEXT function is useful in this situation since it can turn a date into a text string with the desired formatting. The format code “mmdd” or “mm.dd” will suffice for our needs.
The formula looks like this when the source date is in B2:
=TEXT (B2, “mm.dd”)
The data will then be organized in order of the days in each month after you sort the Month and day column from greatest to smallest.
The DATE formula can be used to get the same output as follows:
=DATE(2000, MONTH(B2),DAY(B2))
The formula creates a list of dates by taking the month and day from the actual date in B2 and substituting a fictitious year, in this case, 2000, though you can use any other year.
All of the dates should be in the same year and then be arranged chronologically. The dates will be ordered by month and day because the year is the same, which is precisely what you want.
Scenario Where Customer Success Professionals Can Use This Excel Date Sorting Method:
When the customer success professional wants to create a database of the accounts based on their birthdays sorted by date and month, this excel date sorting method is used.
Data Sorting by Year
The simplest method for sorting dates by year is to use Excel’s ascending sort (Oldest to Newest) option to arrange dates in chronological order.
As seen in the screenshot below, this will first sort dates by year, then by month, and finally by day.
If for any reason, this arrangement does not satisfy you, you can add a helper column that uses the YEAR formula to separate the year from the date:
=YEAR(C2)
Once the Year column has sorted the data, the dates are only sorted by year, ignoring months and days.
Advice: To sort dates by day while ignoring months and years, use the DAY function to extract the day, then sort by the Day column:
=DAY(B2)
Scenario Where Customer Success Professionals Can Use This Excel Date Sorting Method:
When the customer success professionals wish to separate the year from the date of the first subscription of the account, this excel date sorting method is used.
Data by Weekday, Sorted
As in the preceding instances, you will also require a helper column to sort the data by weekday. In this instance, we will be sorting by the helper column after adding the WEEKDAY formula, which yields a number according to the day of the week.
This is the formula to use for a week that runs from Sunday (1) through Saturday (7):
=WEEKDAY(A2)
Here is the correct one if your week runs from Monday (1) to Sunday (7):
=WEEKDAY (A2, 2)
where the date is located in cell A2 (A2).
Using the first formula, we arrived at the following outcome for this example:
Scenario Where Customer Success Professionals Can Use This Excel Date Sorting Method:
When customer success professionals wish to remember the day of the week the account’s subscription is due, they use this excel date sorting method.
Sort Dates by Quarter
As a Customer Success Professional, you might need to sort dates by Quarters for various professional reasons. The easiest way to do it is to use a helper column with a quarter formula.
The Excel ROUNDUP function can help you do this. Assuming your source data is in B2, the formula will look like this:
=ROUNDUP(MONTH(B2)/3,0)
After you type the formula and drag it down, go to Data>Sort. Select the new Quarter column as the Sort By and click OK.
Sort by the Month Names that were Typed in
Applying Excel’s ascending sort could be problematic if you have a list of month names in text form rather than dates structured to display only months. It will organize the names alphabetically rather than by month from January to December. Here, a specific kind will be beneficial:
- If you wish to sort the records by month name, select the records.
- Click Sort under the Sort & Filter group on the Data tab.
- Do the following in the Sort dialogue box:
- Choose the column name that holds the months’ names under Column.
- Select Cell Values under Sort on.
- Go to Order and choose Custom List.
1. Depending on how the months are listed in your worksheet, use either full month names (January, February, March,…) or abbreviated names (Jan, Feb, Mar…) in the Custom Lists dialogue box:
2. To close both dialogue windows, click OK twice.
3. Done! Your data has been arranged chronologically rather than alphabetically by month name:
Tip: In the Custom Lists dialogue box, choose either complete names (Sunday, Monday, Tuesday,…) or short names (Sun, Mon, Tue…) to sort by the names of the days of the week.
Scenario Where Customer Success Professionals Can Use This Excel Date Sorting Method:
When the customer success professional needs to remember the month of a particular account’s subscription due date, they use this excel date sorting method.
How to Auto-Sort Dates When New Rows Are Added (Different Methods)
| Method | Supported versions | Manual/Automatic Sorting | Skill level |
| Excel Tables | Excel 2007+ | Manual (one-click) | Beginner |
| Power Query | Excel 2016+ / Microsoft 365 | Automatically on refresh | Intermediate |
| VBA | All desktop versions | Automatic (using code) | Advanced |
| SORT | Microsoft 365 / Excel 2021 | Automatic | Intermediate |
| SORTBY | Microsoft 365 / Excel 2021 | Automatic | Intermediate |
Excel Tables
Excel’s native tables cannot auto-sort data upon entry. You will have to sort them manually. But you can set an Excel table to dynamically sort itself by using a relatively simple SORT function or a complicated VBA Macro. These automated approaches can also support broader task management processes by helping teams organise deadlines, schedules, and recurring activities.
Power Query
You can sort dates with Power Query using only the user interface and no formula. Simply click the icon on the left side of your data column. Sort the column by selecting Ascending or Descending from the drop-down menu.
SORT (Microsoft 365/Excel 2021)
The SORT feature in Microsoft 365 and Excel 2021 sorts the content of a range or array. SORT can sort an array based on the position of a column or row inside that array. If you need to sort one range using another separate column, SORTBY is usually more suitable.
The basic structure of the formula is:=SORT(array, [sort_index], [sort_order], [by_col])
SORTBY (Microsoft 365 / Excel 2021)
The SORTBY function in Microsoft 365 / Excel 2021 is used to sort a list based on values in a different column or range. SORTBY does not require the sort column to be inside the selected data range. It can be an external column.
The basic structure of the SORTBY formula is : =SORTBY(array, by_array1, [sort_order1], [by_array2, sort_order2], …)
VBA – Advanced Method
The Excel Sort tool handles a range of issues, as you have seen. Its lack of dynamic nature is its lone negative. In other words, you will need to re-sort your data every time something changes, or new data is introduced. Maybe you’re trying to figure out if there is a method to sort data automatically each time a new date is entered so that it is always in the right order.
The most effective approach to do this is by utilizing a macro. The following data will be automatically sorted by date and placed in chronological order using the code examples found below.
Macro 1: Auto-sort each time a worksheet is modified
Every time something is changed in the worksheet, this macro is run.
It is expected that the dates you wish to sort by are in column C, starting in C2, and that your data are in columns A through C. Row 1 is also considered to have headers (Header:=xlYes). Make the changes below if your records are in different columns:
- To your target range’s upper left cell, change the A1 reference (including headers).
- Change the C2 reference to the cell with the date at the top.
Private Sub Worksheet_Change(ByVal Target As Range)
On Error Resume Next
Range(“A1”).Sort Key1:=Range(“C2”), _
Order1:=xlAscending, Header:=xlYes, _
OrderCustom:=1, MatchCase:=False, _
Orientation:=xlTopToBottom
End Sub
Macro 2: When modifications are made to a certain range, auto sort
Re-sorting with even the slightest modification in the sheet could be challenging if you are working with a large worksheet that is filled with a lot of data. In this situation, it makes appropriate to restrict the macro’s triggering to changes that take place within a particular range. Only when a modification is made to column C, which holds the dates, does the following VBA code sort the data.
A Step-by-Step Guide to Add the Macro to your Worksheet
The code should be added to the worksheet where you want to sort the data because both macros are executed automatically whenever a worksheet is changed (Sheet1 in this example). This is how:
- For the VBA Editor to launch, press Alt + F11.
- Double-click the sheet where you want the auto sort to appear in the Project Explorer on the left.
- Paste the code in the Code window.
Using a Formula to Auto-Sort Dates
Consider a scenario in which you have a list of dates and would want them to be automatically organised in chronological order in a second column, next to the original list. This can be accomplished using the array formula below:
=IFERROR(INDEX($A$2:$A$20, MATCH(ROWS($A$2:A2), COUNTIF($A$2:$A$20, “<=”&$A$2:$A$20), 0)), “”)
Where A2 through A20 represents the initial (unsorted) dates, along with a few blank cells for potential future inputs.
The formula is entered in a blank cell next to the column containing the original dates (C2 in our example), and it is finished by pressing the Ctrl, Shift, and Enter keys simultaneously. Copy the formula down to the remaining cells after that (C2 in our case).
Note: Make sure there are enough empty cells in the referred range so that freshly entered dates are automatically sorted. For instance, even if our list of dates falls inside the range A2:A7, we enter $A$2:$A$20 into the formula and fill cells C2 through C20 with it. By delivering an empty string (“”) instead of errors, the IFERROR function eliminates errors in the additional cells.
Scenario Where Customer Success Professionals Can Use This Excel Date Sorting Method:
There are times when customer success professionals have to dig out lot of information about the clients in a go. This is where this excel date sorting method can be very helpful.
Before You Sort Dates
Before you sort your dates, consult this quick checklist to ensure that you haven’t made any common date-sorting errors.
Checklist
✓ Dates are real Excel dates and not other formats like CSV
✓ Dates are not stored as text.
✓ Date formats are consistent and not mismatched.
✓ Regional date format is consistent in both the system and data.
✓ No hidden spaces that can prevent sorting.
✓ Entire table is selected.
✓ Expand Selection is chosen.
✓ Header row is included.
✓ No merged cells. Unmerge if any
✓ Blank rows are removed.
✓ Create a backup before VBA or bulk conversion.
Common Excel Date-Sorting Errors
| Problem | Why it happens | Solution |
| Dates sorting alphabetically | Dates stored as text | Use Text to Columns |
| Oldest to Newest greyed out | Text dates or merged cells | Convert dates / unmerge cells |
| Mixed values | Text and real dates are mixed | Convert text dates |
| CSV dates incorrect | Imported dates interpreted incorrectly | Convert imported dates |
| Rows mismatched | Only one column was sorted | Select the entire dataset |
| Regional format errors | DD/MM and MM/DD conflict | Select correct date format |
Wrapping Up
Our Excel date sorting narrative ends here. These methods should enable you to finish sorting exercises quite quickly. As you put these strategies into practice, we will put together another helpful Excel tutorial to help you come one step closer to excel ninja status.
It is simple and a good method to organize your data to sort it by date. You can complete it quickly if you use one of these approaches. Sorting data by date also helps to keep your work neat and organized.
Frequently Asked Questions
Excel won’t sort dates correctly if a date-sorting error occurs. Common date-sorting errors are dates stored as text, mixed date formats, and hidden spaces.
If your dates are being sorted alphabetically, it usually means that your date data is being read as text by the software. Check for mismatched text strings.
Mixing rows usually occurs when the entire data set is not selected before sorting. Ensure the whole table is selected before sorting.
Yes. Excel can automatically sort new dates as you enter them if you use the auto-sort feature.
Imported CSV dates are usually read as text by Excel. To sort them correctly, use the Text to Column method.
The greyed-out “Sort Oldest to Newest” is usually a telltale sign of a sorting error due to dates being read as text. Use Text to Column to sort them correctly.
To choose the dates you want to sort by, drag down the column. Click the Oldest to Newest or Newest to Oldest buttons under the Sort & Filter section of the Home tab.
Simply select Data > Sort Range > Advanced Range. When your dataset is highlighted in Google Sheets, select Sorting Options from the menu bar. In the newly opened window, turn on “Data Has Header Row.” The “Sort By” drop-down menu will allow you to choose your date column. Choose “A > Z” from the menu to order your dates in ascending order.
Select File from Excel. Select Options (usually in the bottom left corner of the screen). Open the Options window’s left pane and select the Advanced tab. Group dates in the AutoFilter menu should be checked in the workbook settings.
On the Row Labels heading, click the drop-down arrow. From the Row Labels drop-down list, choose the field name. After selecting Date Filters, choose Between. Dates can be entered manually or chosen from pop-up calendars in the Between dialogue box.
Data can be filtered using up to two criteria with AutoFilter, which are entered directly in the Custom AutoFilter dialogue box. The advanced criteria must be entered in a separate range on your worksheet to use Advanced Filter to find rows that satisfy multiple criteria in various columns.